
Products
A- A+
Creating products as a vendor using Dokan is super easy. After your vendor registered on your marketplace, they can easily create products and customize them from an intuitive dashboard.
So check out the documentation to know the process of creating products:-
Create a product from the Vendor dashboard
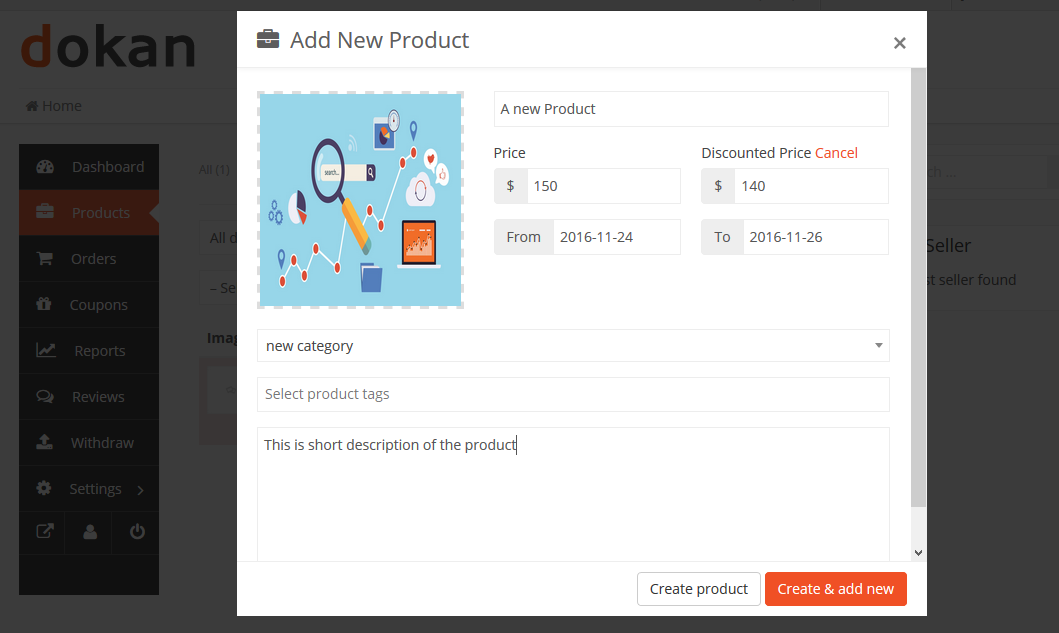
To create a product, navigate to the vendor dashboard. And then click on Products from the left menu. After that click on the Add New Products button from the top right corner.
You’ll get a new window where you will be able to create a new product giving all the details only.

Basic Details
The common information about a product are the title, price, description. Discount price is optional. You can even schedule discounts for a certain amount of time. You can enter a starting date and end date to apply automatic discounts to your product.
Both the categories and tags have to be created by the admin. The vendor can only select them from the frontend dashboard. Because allowing the vendors to create categories and tags might result into duplicates.
Select Category
By default, category selection is singular. That is why there is a drop-down field to select a category. This should be the standard-setting. Because according to Google Webmaster Guidelines and other SEO and UX best practices, it is recommended to have only one category assigned to a product. If you need to show your products based on multiple factors or for searching or sorting feature, you can use tags.
Vendors need to select the category from the drop-down.
If you really need multiple categories in a single product, then it can be enabled from wp-admin → Dokan → Settings → Selling Options → Category Selection.
Admins need to create the categories from wp-admin→Products→Categories.
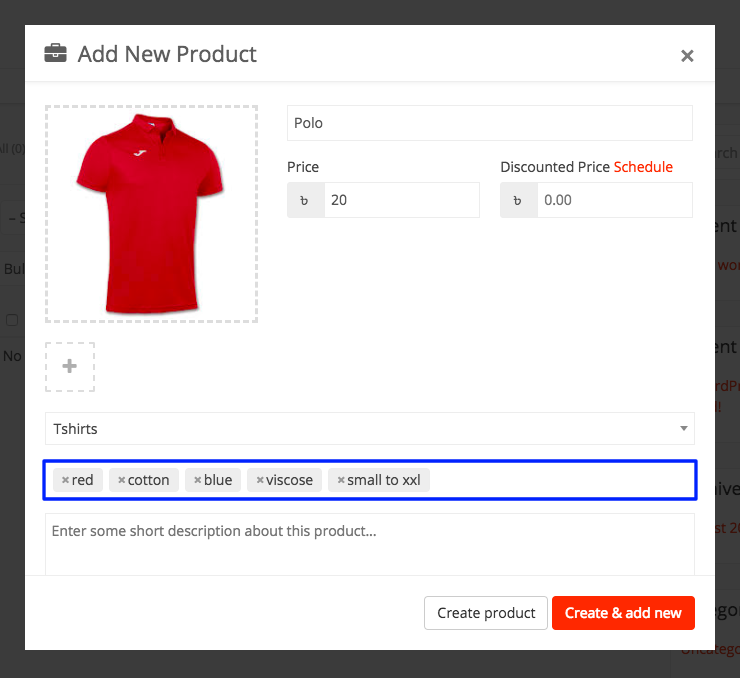
Create Tags
Here using the Dokan pro version, vendors will be able to create new product tags from the vendor dashboard. Previously, vendors were only able to use the tags predefined by Admins from wp-admin→Products→Tags.
Vendors click on Vendor Dashboard>Product>Add New Product. Under the Select Product Tags field, add a tag and Press Enter. The word or phrase will be added as a separate tag.
Admins need to allow this feature from their dashboard.
Admins go to wp-admin→Dokan→Settings→Selling Options. Enable the checkbox for Vendors Can Create Tags. Click on Save Changes.
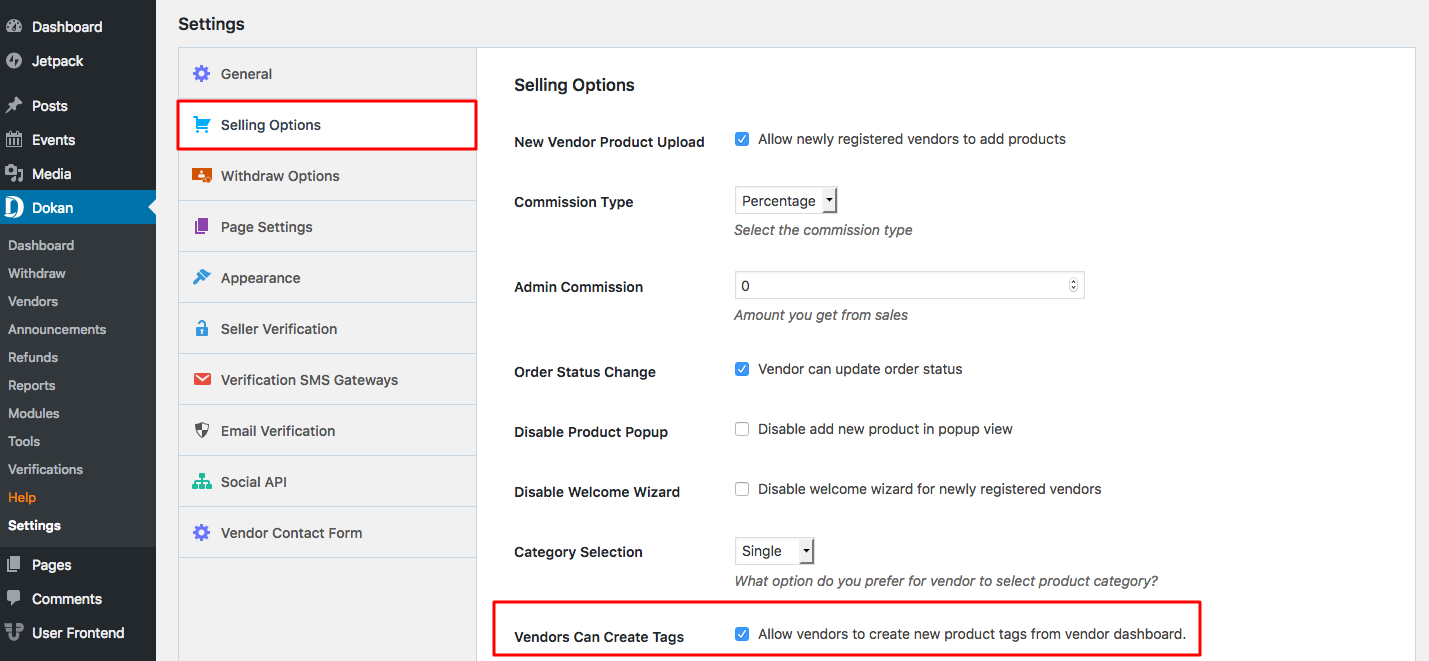
Now your vendors will be able to create their own tags for products.
After you have provided all the required information, Click on the Create product button. It will create the product and redirect you to the product edit page, where you will be able to add more information about your product. If you want to create the product and add another one immediately, click on the Create & add new button.
After you have been redirected to the product edit page, there is an option to select a product type. You can select either a Simple or Variable product.
Selecting Product Type – Simple Product
These types of products are simple and have no variants. They are single and standalone products, which does not require any other information to define different variants.

Selecting Product Type – Variable Product
A variable product is a product that has different types of variants. For example, you might want to sell a dress which is available in 3 different colors and sizes. So this option will enable you to add those colors and sizes you need. You can add variations based on anything you like, perhaps material used or the stitching style.

Variations can be created from two places-
- By admin from backend
- By vendor from product creation page
It’s better to create variations from the admin panel. Because it will save the vendors time and prevent from creating duplicate entries. Of course, the admin will not always know what kind of variations a vendor might need. So he will create a common one and if those do not match the needs of the vendor, then the vendor can create the variations as he needs.
The backend attribute creation and adding feature might seem a bit complicated to some users. So we have streamlined the variation adding and creation process in our interface to improve the user experience.
To create a variation from the frontend, the vendor has to select This Product Has Multiple Options. Then some new fields will appear to input the variations. If you already created some variations from the backend, then you can select them from the dropdown on the top right and click Add Option. If you do not need all the attributes in your product, then you can remove or add more if you want.
Check this video on how to create a variable product →
Now if you need custom variations and attributes of your own, then you have to select Custom Attributes and then click Add Option. Then two blank fields will appear to input the variation name and attributes.
You can add as many variations and attributes as you want. When you are done, check the box Create variation using those attributes. The system will make all the combinations and will prompt you to add prices for those variations.
If you want to disable any variation, then you can uncheck the box on the left.
Quantity and variation picture adding function will not be available right away. You have to save the product once to get those options. Right after saving the product, the fields above will have a pencil icon on the right. Click on that to add more details to the variations.
Selecting Product Type – Grouped Product
To learn about the grouped product go through this tutorial.
Inventory and variants
This section holds a bit of complicated information. None of these fields are mandatory. If you do not need to add stock quantity and your is just a simple product, then you can totally skip this section.
But if you are creating a downloadable product or selling a dress or t-shirt, which has multiple sizes, then you should read this section carefully.

What is SKU?
SKU stands for Stock Keeping Unit. It should be a unique set of characters which will not match to any other product.
Enable Product Stock Management
Let’s say you have 10 pieces of the product and you don’t want to receive after orders are placed for 10 units. If you enable stock management and enter 10 in the quantity field, then after 10 units are ordered, this product will show a message that all the quantities are sold and there is no stock.
But, you might want to take some pre-orders before your next batch comes up. So you can Allow Back Order to let the customers place orders even if the product is out of stock.